Find a gorgeous Handle (kitchen draw kind of handle) but if you look around you may be surprised what you can find to use
Get some e3000 glue or silicone or really strong glue, then glue your handle to the dish
Gorgeous, inexpensive and creative
Thanks to Thrifty chic for Photos
Living on less
Sunday, 23 March 2014
Sunday, 16 March 2014
Freshen Tape
Now this is a great tip
Now this is a great tipFresh tape - A little heat makes old tape work like new. Sometimes, masking tape that's been sitting on a shelf for years won’t pull off the roll without tearing. Freshen it by microwaving it for 10 seconds. Heat softens the adhesive for easy release.
Dry Matches when camping
This is such a great idea
take an old jar
Put sand paper on the top of the lid or I prefer to glue it to the inside of the lid so it also stays dry especially in wet weather or should you fall in water with your back pack on
You will always have dry matches
take an old jar
Put sand paper on the top of the lid or I prefer to glue it to the inside of the lid so it also stays dry especially in wet weather or should you fall in water with your back pack on
You will always have dry matches
Saturday, 8 March 2014
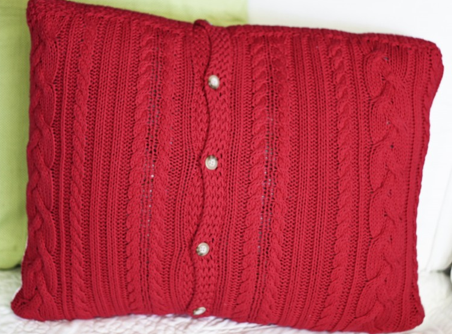
Cushions from knitted Sweater/jumpers
I love these cushions as they look so good, you can also cover any size cushion insert you like but today we are using a 16/16
You will need
1.One jumper-sweater and I like to ones with buttons and this tutorial is for buttoned
2.Fabric to the back if you don't want to make the cushion cover double sided.
3 pre-made cushion insert
Cut the sweater 17/17 for a 16/16 pillow
Keep the sleeves as you can use them for other things
Keep the hem as it adds character to the overall look
Put your jumper square onto the fabric square and hem or pin then stitch all the way around.
Remember to make the corners round and not a 45 degree (point)
Use a Sturdy needle and make a wider edge as wools moves and can be tricky to sew as it stretches
Cut the corners and turn in the right way, un-button the front and insert the cushion insert
Thanks to Honey Bear Lane for the photos
Friday, 7 March 2014
DIY Fairy and Gnome Doors
Fairy Garden Tools
Gather stuff from around the house… popsicle sticks, raid the sewing tins and junk drawers for buttons, thumbtacks, jewelry. Gorilla Wood glue, with hopes that they will hold up to water outdoors and in fairy garden containers. Craft glue, silicone or waterproof glueYou will work out what tools you need as you create and all good crafters have an interesting selection of tools lol
Fairy Garden Door Construction
Its a rather straightforward process. Lay popsicle sticks out to create the design you want. Cut two cross pieces to hold it all together and glue. Pick out cool buttons, charms from old jewelry, moss and glue it on. Wood stain on some, paint on others and left some bare. Here are the first two. To get the button to lay flat, I cut a small hole in the stick with an exacto or box cutter knife and glued the button in.
Add some color! “Feng shui says
that red doors are good luck.” “In China, it’s tradition to paint the front
door red before the new year, to invite good luck and happiness.” “In
Catholocism, the red door on a chapel symbolized the blood of christ to
signify that the ground inside the church was holy, and a sanctuary from
physical and spiritual evils.” “In Ireland, front doors are painted red
to ward-off ghosts and evil spirits.” And last but not least, “It is
just a ‘pop’ of color for a house.”
Thanks to Roots Nursery for the photos and instructions
IMPRESSIVE FREE STANDING FAIRY DOORS
Monday, 3 March 2014
CHAIR LEGS
old chair legs can be made into many wonderful things and I adore dragonflies and butterflies, so choose your chair legs, make wings out of anything such as old fly screens, paint tins, plastic milk bottles, metal chains, barb wire or anything else you think may look good and created a colour garden while recycling
Subscribe to:
Comments (Atom)


